AndroidStudio で Gradle7 を使うようになって JDK11 が必須となり、JDK1.8 のプロジェクトを JDK11 に切り替える必要があり頻繁にJDK11 と JDK1.8 を切り替える必要があり zsh の alias でしのいでいましたが行けていなかったので調査

結果以下で対応

.zshrc

jdk() {
    version=$1
    unset JAVA_HOME;
    echo "/usr/libexec/java_home -v$version";
    export JAVA_HOME=`/usr/libexec/java_home -v$version`;
    java -version
}

使い方、コマンドラインから jdk 1.8 or jdk 11
gradle でバージョンを指定する時は、 compileSdkVersion rootProject.ext.compileSdkVersion で指定したり compileSdkVersion buildConfig.compileSdk 等と指定したりしていましたが、
compileSdk build_versions.compile_sdk と言う記述を見つけました。
これからは、上記を使おうかと思います。

versions.gradle ファイル

def build_versions = [:]
build_versions.min_sdk = 14
build_versions.compile_sdk = 31
build_versions.target_sdk = 31
build_versions.build_tools = "31.0.0"
ext.build_versions = build_versions

def versions = [:]
versions.activity = '1.1.0'
versions.core_ktx = "1.1.0"
ext.versions = versions

build.gradle

buildscript { 
    apply from: 'versions.gradle' 
} 

android { 
    compileSdk build_versions.compile_sdk 
} 

dependencies { 
    implementation "androidx.core:core-ktx:${versions.core_ktx}" 
}


deps. までは、やらないかな

https://github.com/android/architecture-components-samples/blob/main/BasicSample/app/build.gradle

https://gist.github.com/Schadenfeude/8ed81dd06f01d6eeab571555fc8308d1

./gradlew tasks

Unity の Android Plugin を Java で作成

Kotlin に移植したら以下のエラー

03-27 16:34:55.789  3261  3261 W Unity   : Native libraries not loaded - dropping message for ScriptObject.OnLoadImageFromFolder

class MainActivity : Activity() {

class MainActivity : UnityPlayerActivity() {

継承もとのクラスが間違ってた…

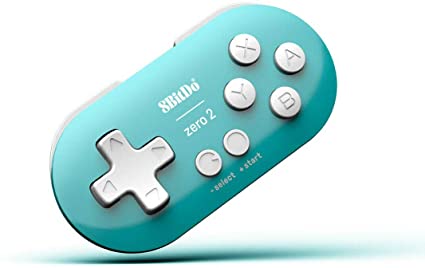
ゲームパットの動作の検証用に新しく購入。

Android や、Windows、Mac 対応なので、Android アプリのジョイステック機能を PC 上のジョイステックでデバックをするのが目的

かなり接続に苦戦!

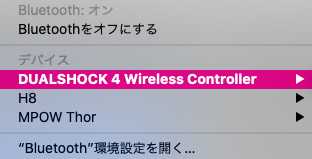
Macの接続は、A + Start ボタンを押して、LEDが点滅したらSELECTボタンを3秒

認識は、DUALSHOCK4 Wireless Controller ?

はじめに説明書を適当に読んで接続したら Pro Controller と認識してジョイスティック機能が使えなかった。

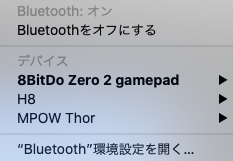
何度か使ってると認識は、8BitDo Zero 2 gamepad になりました。

Android の接続は、B+Start ボタンを押して、LEDが点滅したらSELECTボタンを3秒

認識は、8BitDo Zero 2 gamepad

取り敢えず無事認識して使えました。

これで Android アプリのジョイステックのデバックが捗りそう。

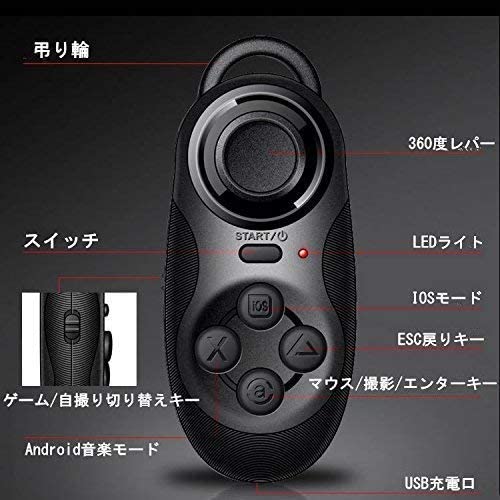
300円位のジョイスティック mocute-032 を購入したが、実際のボタンの値が分からず確認の為のスクリプトを作成
おそらく、汎用的に確認できます。

この値段で充電式は、驚き!

モードはゲームモードでAndroid 

void Update()
    {
        UpdateGetKey();
        // UpdateKey();
    }    

void UpdateGetKey()
    {
        float horizontal = Input.GetAxis("Horizontal");     // joystick horizontal
        float vertical = Input.GetAxis("Vertical");      // joystick vertical

        Debug.Log("x y:" + horizontal + "," + vertical);
        foreach (KeyCode value in Enum.GetValues(typeof(KeyCode)))
        {
            if (Input.GetKey(value))
            {
                String name = Enum.GetName(typeof(KeyCode), value);
                Debug.Log("Input.GetKey:" + name);
            }
            if (Input.GetKeyDown(value))
            {
                String name = Enum.GetName(typeof(KeyCode), value);
                Debug.Log("Input.GetKeyDown:" + name);
            }
            if (Input.GetKeyUp(value))
            {
                String name = Enum.GetName(typeof(KeyCode), value);
                Debug.Log("Input.GetKeyUp:" + name);
            }
        }
    }
adb logcat | grep Joy

02-24 13:42:55.463  1346  1358 I ActivityManager: START u0 {act=android.intent.action.MAIN cat=[android.intent.category.LAUNCHER] flg=0x10200000 
02-24 13:45:54.033  2993  3016 I Unity   : Input.GetKey:JoystickButton2 
02-24 13:45:54.033  2993  3016 I Unity   : Input.GetKeyDown:JoystickButton2 
02-24 13:45:54.033  2993  3016 I Unity   : Input.GetKey:Joystick1Button2 
02-24 13:45:54.033  2993  3016 I Unity   : Input.GetKeyDown:Joystick1Button2 
02-24 13:45:54.051  2993  3016 I Unity   : Input.GetKeyUp:JoystickButton2 
02-24 13:45:54.051  2993  3016 I Unity   : Input.GetKeyUp:Joystick1Button2 

02-24 13:45:55.333  2993  3016 I Unity   : Input.GetKey:JoystickButton0 
02-24 13:45:55.333  2993  3016 I Unity   : Input.GetKey:Joystick1Button0 
02-24 13:45:55.352  2993  3016 I Unity   : Input.GetKey:JoystickButton0 
02-24 13:45:55.352  2993  3016 I Unity   : Input.GetKey:Joystick1Button0 
02-24 13:45:55.367  2993  3016 I Unity   : Input.GetKey:JoystickButton0 
02-24 13:45:55.367  2993  3016 I Unity   : Input.GetKey:Joystick1Button0 
02-24 13:45:55.383  2993  3016 I Unity   : Input.GetKey:JoystickButton0 
02-24 13:45:55.383  2993  3016 I Unity   : Input.GetKey:Joystick1Button0 
02-24 13:45:55.402  2993  3016 I Unity   : Input.GetKeyUp:JoystickButton0 


Error:android-apt plugin is incompatible with the Android Gradle plugin. Please use ‘annotationProcessor’ configuration instead.

いつの間に...

https://github.com/noboru-i/SlideViewer/pull/52/files

def dbflow_version = "4.0.5"
dependencies {
    annotationProcessor "com.github.Raizlabs.DBFlow:dbflow-processor:${dbflow_version}"
    // apt "com.github.Raizlabs.DBFlow:dbflow-processor:${dbflow_version}"

ユーザーID が日本語で入力する事になりました。
さすがに毎回入力するにはしんどいです。

以下のアプリを使用する事で、PC から android の入力が可能です。

aNdClip
airdroid

aNdClip は、クリップボードの履歴を保存する事が可能です。
airdroid は、PCからの操作を可能にします。

aNdClip を起動します。
airdoid を起動して、PCのブラウザー経由で 携帯と接続します。
airdroid の toolbox より clipboard を選択します。
入力したいテキストを入力して、送信ボタンを押す事で、aNdClip の履歴に保存されます。

実際に入力したい時は、aNdClip の履歴から選択して、入力フィールドを長押しして貼り付けを選択する事で、入力する事ができます。

次回からは、aNdClip の定型文の登録すれば、再利用可能です。

adb なら

adb shell
input text hogehoge

SH-04M を購入したのですが、内部メモリーが少なすぎ&SDカードにアプリが移動できない

以下のコマンドを実行で、128Mの半分を内部メモリーに変更


adb shell
sm partition disk:179,64 mixed 50
exit

カンマも必要デス。

これで、SDカードに移動出来ます。

Android ZXing QRコード読み込み画面に、白枠をつけるには?

バーコードの読み取りエリアは、150dp

<Framelayout>
    <RelaytiveLayout>
       barcode scan
    </RelativeLayout>
    <RelaytiveLayout>
       cross line
    </RelativeLayout>
</Framelayout>

xml

<?xml version="1.0" encoding="utf-8"?>
<FrameLayout xmlns:android="http://schemas.android.com/apk/res/android"
    android:layout_width="match_parent"
    android:layout_height="match_parent" >

<RelativeLayout
    android:layout_width="match_parent"
    xmlns:app="http://schemas.android.com/apk/res-auto"
    android:layout_height="match_parent">

    <com.journeyapps.barcodescanner.DecoratedBarcodeView
        android:id="@+id/barcode_scanner"
        android:layout_width="match_parent"
        android:layout_height="0dp"
        android:layout_above="@+id/buttonsLayout"
        app:zxing_scanner_layout="@layout/custom_barcode_scanner"
        android:layout_alignParentTop="true">

    </com.journeyapps.barcodescanner.DecoratedBarcodeView>

    <LinearLayout
        android:orientation="vertical"
        android:layout_width="match_parent"
        android:layout_height="0dp"
        android:layout_alignParentBottom="true"
        android:id="@+id/buttonsLayout"
        android:layout_toLeftOf="@+id/centerHorizont">

        <Button
            android:layout_width="match_parent"
            android:layout_height="wrap_content"
            android:text="Pause"
            android:onClick="pause" />

        <Button
            android:layout_width="match_parent"
            android:layout_height="wrap_content"
            android:text="Resume"
            android:onClick="resume" />
    </LinearLayout>

    <View
        android:layout_width="0dp"
        android:layout_height="match_parent"
        android:layout_centerHorizontal="true"
        android:id="@+id/centerHorizont" />

    <ImageView
        android:layout_width="wrap_content"
        android:layout_height="0dp"
        android:layout_toRightOf="@id/centerHorizont"
        android:layout_alignParentBottom="true"
        android:layout_alignParentRight="true"
        android:layout_alignTop="@id/buttonsLayout"
        android:id="@+id/barcodePreview" />

    <LinearLayout
        android:layout_width="match_parent"
        android:layout_height="match_parent"
        android:layout_alignLeft="@+id/barcode_scanner"
        android:layout_alignParentTop="true"
        android:layout_alignStart="@+id/barcode_scanner"
        android:orientation="horizontal"></LinearLayout>

</RelativeLayout>

    <RelativeLayout
        android:layout_width="match_parent"
        android:layout_height="match_parent">
    <LinearLayout
        android:layout_width="match_parent"
        android:layout_height="50dp"
        android:layout_gravity="top"
        android:background="@android:color/white"
        android:orientation="vertical">

        <Button
            android:id="@+id/button"
            android:layout_width="wrap_content"
            android:layout_height="wrap_content"
            android:text="戻る" />
    </LinearLayout>

        <TextView
            android:id="@+id/qr_scan_message1"
            android:text="qr_scan_message1"
            android:layout_width="match_parent"
            android:layout_height="wrap_content"
            android:layout_above="@+id/crossLineLayout"
            android:layout_marginBottom="50dp"
            android:layout_marginRight="30dp"
            android:layout_marginLeft="30dp"
            />

        <TextView
            android:id="@+id/qr_scan_message2"
            android:text="qr_scan_message2"
            android:layout_width="match_parent"
            android:layout_height="wrap_content"
            android:layout_below="@+id/crossLineLayout"
            android:layout_marginTop="50dp"
            android:layout_marginRight="30dp"
            android:layout_marginLeft="30dp"
            />

    <!-- cross line -->
    <LinearLayout
        android:id="@+id/crossLineLayout"
        android:layout_width="153dp"
        android:layout_height="153dp"
        android:layout_centerInParent="true"
        android:orientation="vertical">

        <View
            android:layout_width="match_parent"
            android:layout_height="1dp"
            android:background="@android:color/white" />

        <LinearLayout
            android:layout_width="match_parent"
            android:layout_height="75dp"
            android:orientation="horizontal">

            <View
                android:layout_width="1dp"
                android:layout_height="match_parent"
                android:background="@android:color/white" />

            <View
                android:layout_width="75dp"
                android:layout_height="match_parent"
                android:background="@android:color/transparent" />

            <View
                android:layout_width="1dp"
                android:layout_height="match_parent"
                android:background="@android:color/white" />

        </LinearLayout>

        <View
            android:layout_width="match_parent"
            android:layout_height="2dp"
            android:background="@android:color/white" />

    </LinearLayout>
</RelativeLayout>
</FrameLayout>
© 2024 Falco Tech Blog Suffusion theme by Sayontan Sinha